Thursday, December 23, 2010

Shaker Side Tables: Butterfly Keys on Imperfection #1


I've been looking forward to inserting the butterfly keys on Imperfection # 1 since I first saw the checks on this highly figured board.  These inlays bring to mind George Nakashima and all of the great furniture and noble ideas that he brought to the craft.  And I must say that when Tyler mentioned them on teal and gold, his hip, artsy blog , I remembered how satisfying it feels to tap them home with just a bit of glue -- each tap snugging the carefully-cut key into its recess.

Sometimes these keys are completely cosmetic, inserted to add interest or to justify the inclusion of a tiny crack that poses no structural threat to the piece.  In this case they are very necessary as they need to span a fissure of nearly 1/4".

My method for making the keys, cutting the mortices, and truing the butterflies is fairly old school, with a couple of my own quirks.

I cut the butterflies by hand.  In my opinion, a great deal of the charm in these details lies in the slight asymmetry that comes from hand sawing each piece.  Those templates with their sterile forms and perfect geometry always put me off.  In many ways this is just like cutting a double-sided tail in a half-blind joint.  And like executing this joint, success for me comes when I keep in mind which faces will show in the finished product.
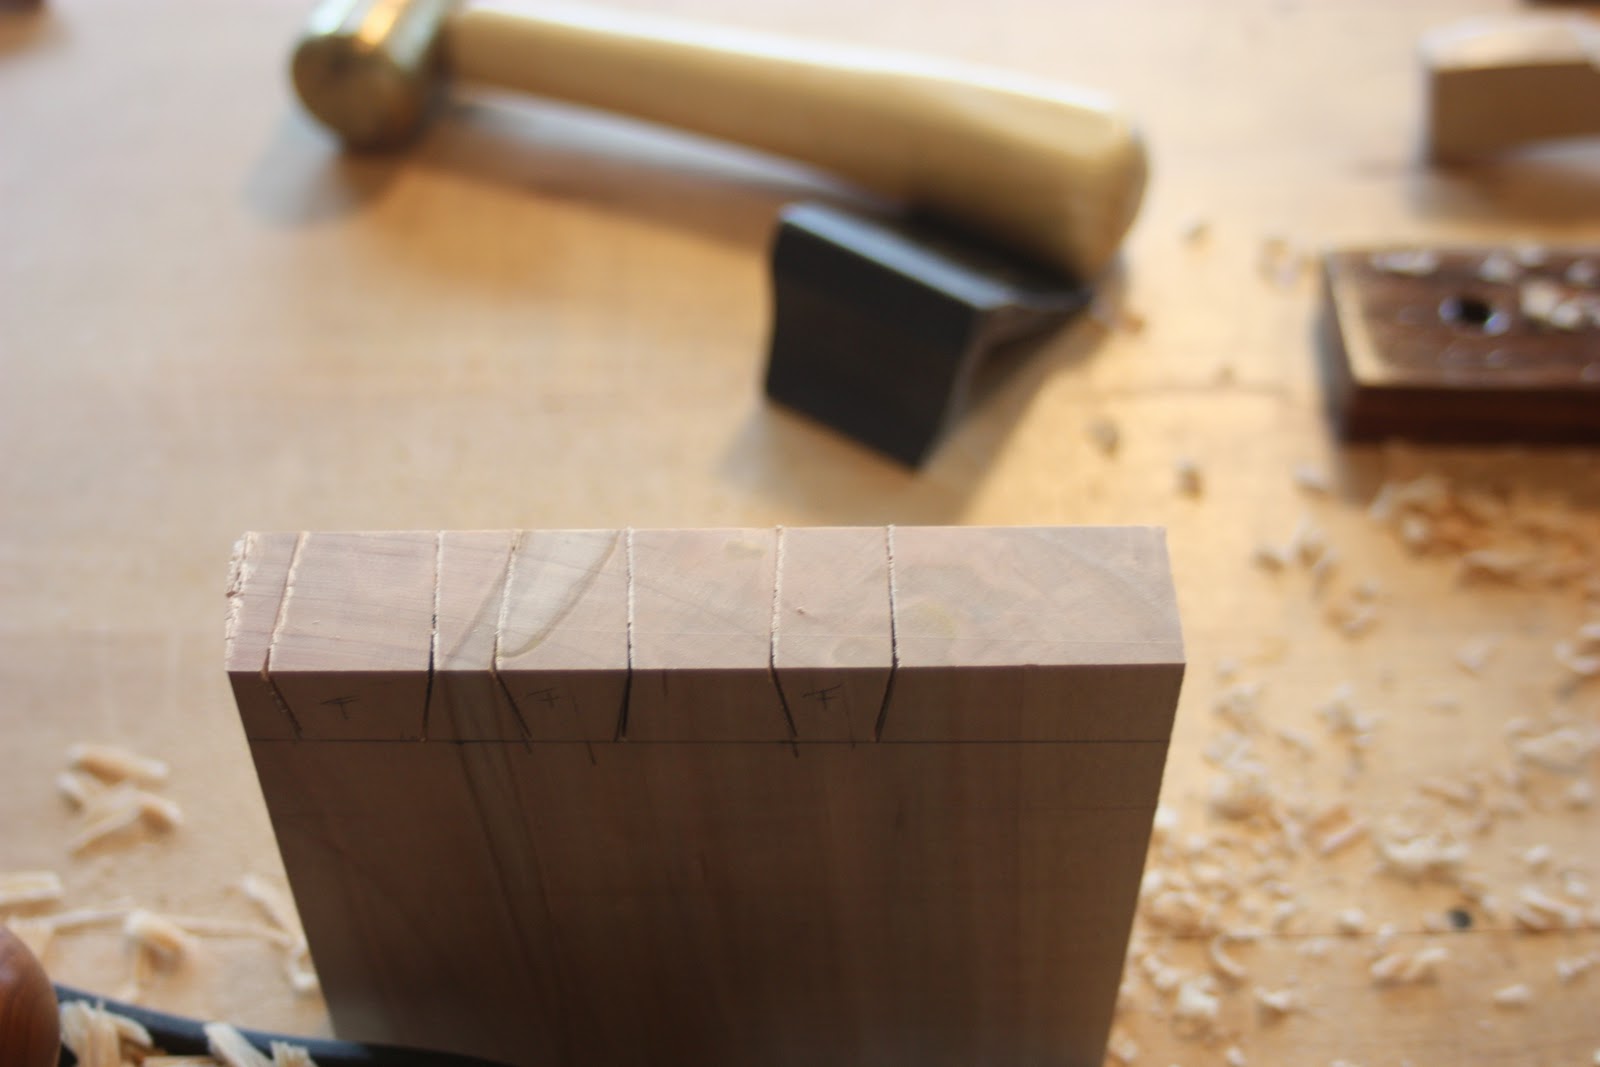

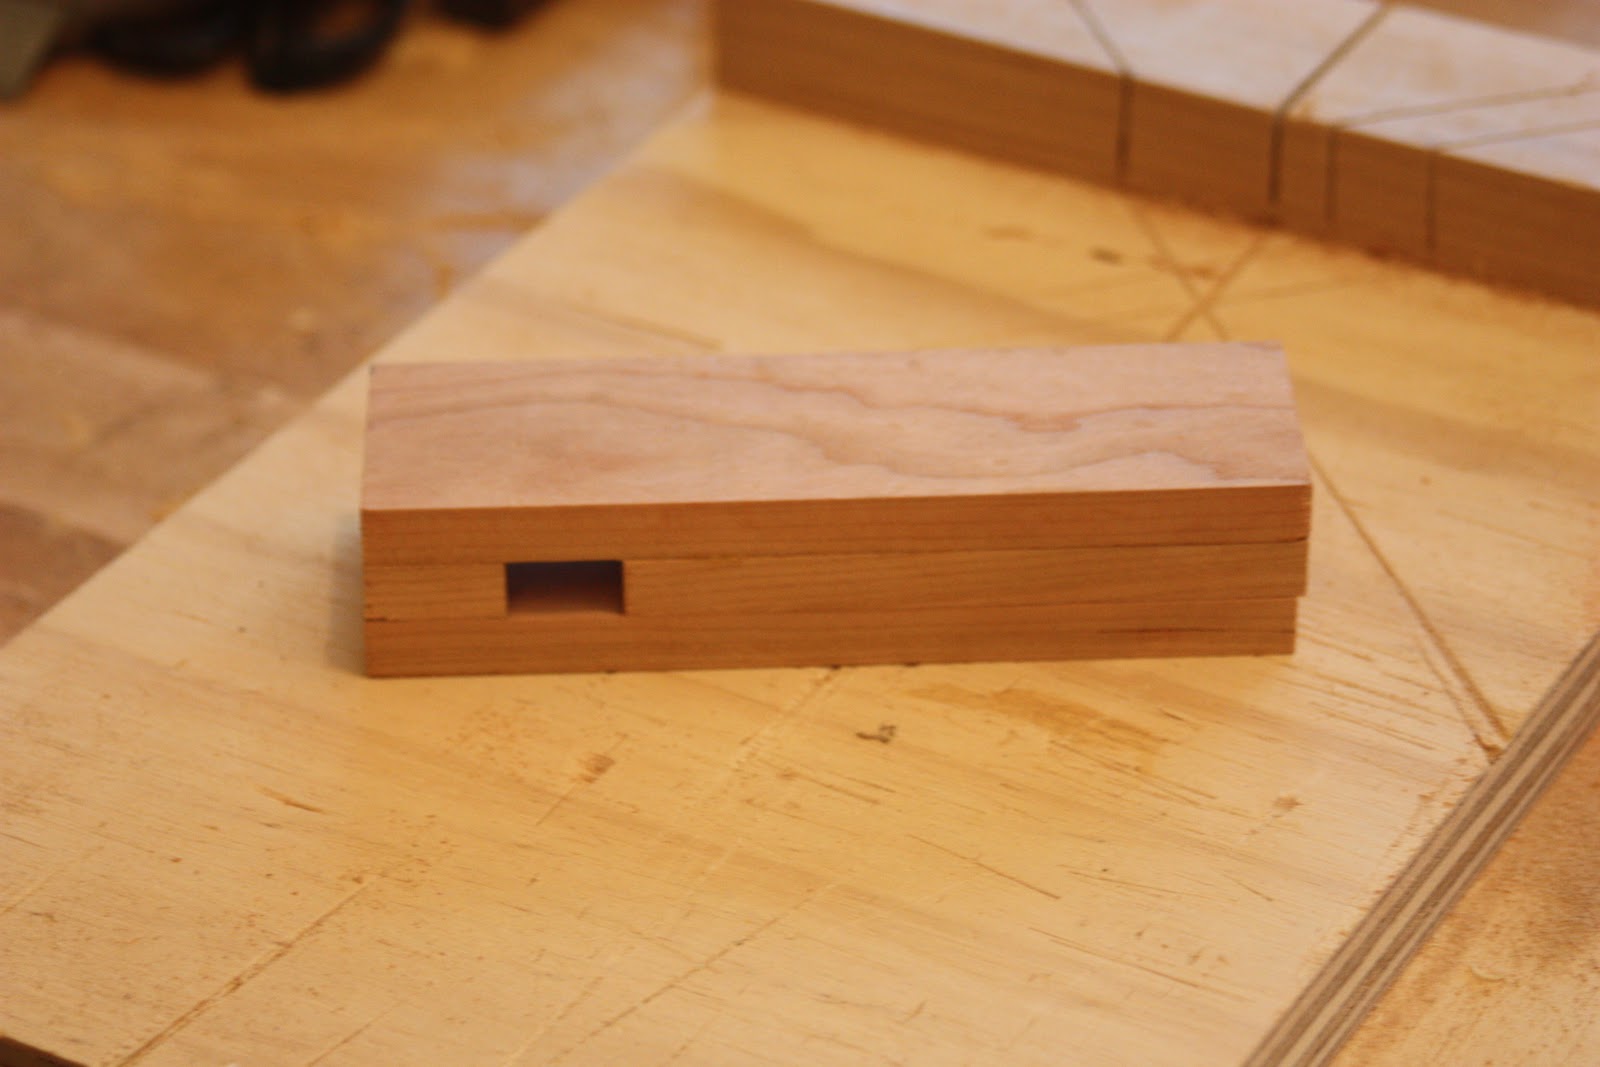
I cut these butterflies on a 1:8 ratio, using my dovetail marker on 1" maple stock.  As much as I wanted to create slim hourglass shapes, I needed to keep some meat in the middle for strength.  I like the subtle contrast between cherry and maple; I suppose that if I really wanted to make it pop I would have gone with holly or box keys. The grain should run the length of the key.  I like to lay them out, angle the tops, make the cuts on the side, and free them all with one crosscut along their bottoms.

After laying out the shapes my aim is to make sure that the bottom of the key is ever so slightly narrower than the top.  To prepare the top of the keys I take a few passes with a low-angle plane, across the grain, creating an angle toward the back of the key.  For the zig-zag sides of the key I start my saw cut at the outside of the line at the top and on the inside of the line at the bottom.  This biases the cut to something like a 1 degree angle.  To quote James Krenov, "just enough so that only you know that it's there."  Once the keys are cut, a little cleanup with a wide chisel makes the edges true -- straight lines and consistent angles are important.

I transfer the shapes of the keys to the table top with a sharp pencil, tracing around the slightly narrower bottoms, just as they will be placed in the top.  I find that if I cut the mortice to the outside of these pencil lines it give you clearance to insert the key without fiddling.  And because the key gets slightly wider from bottom to top, it snugs itself as it is inserted.  I do use a router to hog out most of the waste, but not in the traditional manner.


I have never liked working a router freehand, regardless of the situation, and in particular I don't like moving it within a scribed line -- too many things can go wrong.  Instead, I use a 1/4" spiral bit and plunge it into the waste area.  The result is no broken bits and no irretrievable disasters here at step 432 of the project.  I then incise the line with a chisel and remove the remaining waste.


Just a quick word about the thickness of the keys. The recess is about 1/2" deep and the keys begin life at about 1" thick.  I'm unconcerned (within reason) about how deep these get inserted as long as they don't bottom out before they are snug.  I use just a bit of glue around the bottom edge of the key as it goes on. and a bit of glue in the mortice -- but not much.  As much as I'd like to trim these with a flush cut saw, I don't.  The maple is hard, a bit chunky, and I've found that a delicate saw balks at this challenge.  Instead I use my dovetail saw and remove the 1/4" that remains with a block plane.


When using the block plane I put a sheet of paper or masking tape down before I start.  The result will be a key that protrudes by that thickness (which sometimes I leave) and can be easily sanded with 220 grit during final surfacing.  In this case, I sand to 400, to get a bit of sheen on the top (contrasting with the imperfection of the mended crack.)  A quick bit of work with the spokeshave readies the edge for finish.


I couldn't help myself.  The top picture shows how the table is coming along with a quick coat of boiled linseed oil.  I'm pretty pleased with the look, but there are a couple of little cosmetic tricks I need to do before it is complete.  The last step is to secure the top to the pedestal.  As I want to display the figure and the butterflies, I'll do this via a tilting mechanism. 

The final post in this series will have a (mercifully short) description of aforementioned tilting mechanism and final pictures of the Shaker Round Stand, The Single Drawer Sewing Stand and this, Imperfection #1.

Cheers, Merry Christmas, and let me know what you think.

Sunday, December 19, 2010

Sunday ToolFoolery - A Stanley Miter Box As Bench Accessory


You may remember, (from your county fair-going days) the old midway game where you roll a coin down a slot onto a platform.  A long bulldozer-like blade moves forward and, if you are lucky, your coin will force other coins (or valuable prizes like switchblades and naked lady bottle openers) off the other side and into a tray.

Keep this image in mind and you have a fairly accurate picture of my benchtop.  I start the day with the best of intentions, but as work proceeds, tools begin taking that short drop into the tray.  I knew my new Stanley Miter Box wouldn't stand a chance in this environment.  I would need it, there would be nowhere to put it, and I'd stop using it.

That tool tray, however, may be the answer to all my troubles.  In my hands it is simply a catch-all for tools, an amalgam of shavings, and tiny pieces of wood I "must keep."  But in an organized person's shop, it could serve as a kind of bedway for two sliding platforms to hold a miter box and a support/stop for longer work.


But before I begin, I need to thank a couple of very helpful folks who set me straight on my misguided thoughts about the "holdfasts."  Both David from the Yukon and Greg from Kentucky correctly noted that they are actually "stops" to help you create a compound angle for cutting crown moulding.  This makes much more sense and changes my approach to how they are secured.  Instead of the cam clamp, I will use thumbscrews on two stops.  Thanks for your insights.

Now back to the platforms. . .

I started by glueing up more oak to a width of around 11 inches.  After a quick scraping, I cut this into two pieces -- the first to hold the box, the second to hold the support.  A block on the back and a strip of oak along the underside created a channel to allow the platform to slide along the back rail of the bench.  An eyescrew through that back block secures it in place.


The platform for the box is very straightforward -- just place the box on top and secure with screws.  The support is a little more interesting.

I wanted something simple and robust.  The main objective was to have something that could serve as just a support, or as a support and a stop.  Here was my solution.  As a support. . .


And as a stop. . .


The height of the support box matches the height of the miter box top and the stop meets the box top at the fence line -- so that you can use it as a stop for the narrowest of material.  As you can see, the stop just pops in and out.

I even had some time to make a start on a new handle.  The original was beech, ugly, and machine made.  I also had to cut it two in order to remove the sawplate for sharpening.  My plan was to make a smaller handle, from walnut, to match my other hand saws.  Upon reflection, I realized that the size of the handle on the the sawplate needed to be the same as the old profile.  If not, the aging of the metal would form a shadow of the original.  Also, a smaller grip looked out of proportion with the full-sized front of the handle.

The new handle will be made of curly cherry (an offcut from Imperfection #1) and be a stylized version of the original.  Here it sits after the initial bandsawing and some rough rasp work.


I'll complete this handle, attach it to the newly-sharpened saw plate, and take the miter box for a test drive in the next edition.

Meanwhile. . . I have to share these photos.  We never get snow geese in our pond, so imagine my surprise when I looked out of the shop window this morning.

They spent the day parading through the yard and squabbling with the resident Canada geese. . .


And when dusk came, off they went . . .


Good luck, and happy holidays.


Thanks for reading, and feel free to make corrections!

Thursday, December 16, 2010

Shaker Side Tables: Designing and Creating Imperfection #1


The third in this series of three shaker tables is a bit of a departure. During my last long cycle ride of the season I stumbled upon, quite by accident, the relocated Amish school in Nickel Mines, PA.  I was taken by the beauty of the day, the autumn weather, and the sheer joy of the children outside playing baseball.  I was amazed at how such beauty could exist so close to such tragedy; our own imperfection lying so close to our innocence.

On the long ride home I wrote some words in my head and sort of put those feelings aside -- until I saw this bit of wood leaning up against the wall at one of my hardwood suppliers.  There, next to a stunning bit of figure, ran two long cracks that rendered the wood virtually worthless -- except if you were willing to accept the beauty and the imperfection side by side.


So instead of building a double drawer sewing stand, I'll be using this board to create Imperfection #1, a tilt-top round table -- inspired by Shaker design.  And because of the size of this board, most of the cutting, smoothing, and shaping will need to be done by hand tools -- with some exceptions. I'll be using the pedestal base that I built a couple of weeks ago and fashioning a simple "bird cage" tilting mechanism.  So here goes.

Using a hand saws I crosscut and ripped this to about 120% of its finished size.  While crosscutting, the kerf snapped closed and I had to wedge it to finish the cut.  Duly noted.


The next order of business was to address the severe cupping inherent in a board like this.  I started on what will be the underside of the table to get a sense of how difficult this will be to work.  The crotch figure is fine -- almost like working a hard burl, no tearout, especially with the low angle jack.  There is one area (near the knot that I have eliminated) that wants to tear out regardless.  I pulled out my Stanley #80 cabinet scraper and worked that area.  I'm looking to get this fairly level but not perfect as I don't know how this will move given some of the stress.

I needed to take down something in tha area of 3/16" on the sides of the top, and a similar amount from the middle of the bottom.  Starting with my much-loved Stanley 5 1/2 used as a scrubber, I went after the top.  The low angle was great on the middle figure on the bottom -- and curiously -- a spokeshave put a nice sheen on this underside (I mean, why? One is low angle; the other is high angle!)


When I had this to somewhere in the vicinity of 1/32" flat I called it quits.  There were more cuts to come (that might unleash the tension I'd already seen) and I was going to be banging it around a bit (so it was sure to pick up some scratches.)  In order to figure out the layout of the circular top, I used two spring clamps and a length of old bandsaw blade set to a diameter of 21 inches. I drilled a 3/8" hole in center and used my circle-cutting jig on the bandsaw to cut this to size. 


So, if you think handling a naked bandsaw blade as a template looks dangerous, then we're just getting started.


The Occupational Safety and Health Administration, the Commonwealth of Pennsylvania, and my own conscience require me to toss up all kinds of red flags at this point.  If what what follows next doesn't seem like the scariest thing I've ever done on a table saw, it will do until a scary thing gets here.  So even with all the caveats about guards, eye protection, and staying very aware of the moving blade, I'm not recommending this method to anyone.

At 21 inches, this top was too big to put on my lathe to taper the edge (which is about 1 inch thick and too clunky for my taste.)  I suppose that if I had an outboard rig I could strap it on there, but most of the work would have you pushing the top away from the headstock, without a tailstock to back it up.  So this is a non-starter.  Recently, I read an article about using your table saw to taper the curved end of a table top.  You hoiked it up on edge, angled the blade, and ran it through in a series passes, sanding the rough spots after you were done.  I thought, "Why not turn this up to 11" and do an entire circle in this manner.


So I created a set-up, with the help of my tenoning jig, that allowed me to angle the work back about 15 degrees from the blade.


I then used the same 3/8" hole on the bottom that affixed it to my bandsaw circle-cutting jig, and built a support to hold the top against this board so that it would stay in place, yet turn freely.  I started by taking a pass, rotating it 10 or so degrees, then taking another pass.  Here it is, part way through.


As you can see, there is a bit of burning that took place -- a direct result of the slight wobble in this somewhat flimsy jig.  And in spite of the terror it invoked when I crawled atop the saw and gave it a final 360 degree turn, whilst centered against the blade, I will use this method again.  I'll just build a much larger, purpose-built, jig that will be more solid than this arrangement.

In contrast to this two-hours-of-jig-building-and-45-seconds-of-terror experience, I was happy to get to some hand work.  I started by scribing a reference line about 1/2" from the table top along the edge. . .


. . . And then worked it to an even reveal along the edge and on the back. "Ahhh, what a piece of work is a spokeshave, how noble in reason, how infinite in faculties, in form and moving."


 Next, I will layout, cut and install the butterfly keys, build the tilt-top mechanism, and install it on its base.

Thanks for looking, and please let me know what you think!

Sunday, December 12, 2010

Sunday ToolFoolery - Hot-Rodding A Stanley Miter Box (Part One)


The best car I ever owned was a brick red 1970 Karmann Ghia convertible.  It wasn't fast, but it did most of what a pricey roadster did at a fraction of the cost.  And because it wasn't a museum piece, I was free to make any modifications that I saw fit -- such as adding a chrome gas pedal in the shape of a bare foot.  I have similar emotions about my favorite used tools.  And while I won't be painting any flames on the side of a Stanley #1, I will do what it takes to modify things to make them fit my style.

Enter the Stanley 2246 mitre box.

Christopher Schwarz, (a man who is apparently not above decorating the sides of planes!) has been making it rain around the value of these fairly workaday tools.  Every time I looked for one on ebay, the winning bid was outrageous (My ebay account is still watching a box that went for $387.00.) So his latest musings, imploring us to get off our butts and look for them in person, was a stroke of the bleedin' obvious


Right on cue, I stumbled upon a well-used Stanley 2246 in my super-secret antique tool shop.  All the mechanisms worked great and the price, including a non-descript 27" saw (Disston, a division of Porter Co.) was less than the shipping price of many I've seen online.  And because it was missing a few bits and bobs, I had no qualms about customizing this little beauty.

My goal is simple -- I want to get that blasted chop saw out of my machine tool room.  Even by my pretty loose standards it is too loud, takes up too much space, and belches forth way too much dust to rationalize its existence.  It has a home waiting for it in the garage.  But in order to make this happen, I need to make the new saw accessible, versatile, and able to do everything that the electric version does today.  So here goes . . .


The first step is to get rid of the bright red, balsa-wood top that comes standard.  I want to be able to support slightly longer stock on a wider base.  I decided to use white oak as that's what I have lying around.  The 2246 has two holdfasts that slide across the top in order to secure pieces during the cut.  While I'm not sure of the real utility of that, I didn't want to abandon the idea completely.  Instead of two, I opted to go with one (on the left side) and I decided to fashion it from oak and cherry to replace the pitted steel original.  (I can easily add the other if it seems useful.)  I also switched from a thumbscrew to a purpose built cam clamp to add a bit of  grip to the holdfast.


The plans for the shop made cam clamps came from a helpful article written by Sam Howe.  I modified this just a bit, using a wooden clamping bar and doing a glue-up of 3/8" cherry for the body.  It will be interesting to see how these hold up.  I won't go into too much detail on the construction, as I plan to do a full post on the clamp construction in January.  Once completed, the clamping mechanism looks something this.


Next, I wanted to deal with the grubby grey paint that adorned the top half of the cast iron body.  Traditionalists look away, as I'm about to make you sick.  After a quick scrub down I gave it two coats of Rustoleum's "Hammered" grey finish.  I think it looks pretty spiffy, and I must say that I would consider this (in black) if I wanted to dress-up a low grade plane with some faux "japanning".  I'm leaving the black portions "as is" (even I have my limits.) 


As luck would have it, just as I started thinking about the saw, I read a post from Bob Rozaieski at Logan Cabinet Shoppe that he was getting into the saw sharpening business.  I like his blog, and interactions with him are always pleasant.  So, after some back and forth about fleam and rake, this blade (and another carcass saw) was on its way across the Delaware River for sharpening.  The cheap handle on the saw was stained, so off it came. Unfortunately a chisel and saw came into play, which means that I'll making a handle in next week's post.


I'm convinced that the success of this tool, for a lazy man like me, will depend on whether it stays close at hand.  If I have to lug it out from under the bench every time, I'll pine for the old chop saw.  Likewise, if I can't set it up for repetitive cuts (such as making rails and stiles), it will become a bore.  So my task between now and next Sunday is to get a good start on a new handle, and come up with a good way to mount this on my bench.  And that's where I'll pick up.

As always, improvements, comments and questions are always welcome.  Thanks for reading! 


Thursday, December 9, 2010

Shaker Side Tables: Two Down, One To Go!


The second in this series of three Shaker side tables is a Single Drawer Sewing Stand.  Historical accounts from people like John Kassay, Christian Becksvoort, and Robert Treanor would place this piece somewhere in the middle of the 19th century.  If you are keeping score (and I am), a table like this may have been made in the Hancock community in western Massachusetts.

Having turned the simple post, and shaping the cabriole snake-foot leg, the main work at hand was to complete the drawer and affix the top.  As this is a two-fronted "push-me-pull-you drawer" it requires two drawer fronts fitted with half blind dovetails.  I had stumbled across some stock marked "common curly cherry"  (the only thing that made it common were its dimensions, as it is completely clear) and I was happy to pay the $2.50/bf for this fairly tasty bit of figure.


Fitting the drawer into the yoke exposed a bad habit.  Like adding one more jalapeno to the pot, or having one more glass of wine before I go, I tend to add about 1/16" extra to a cut "just in case."  It doesn't sound like a lot, but it caused me more time than I care to mention when it came to fitting the drawer.  That being completed (with the requisite self-loathing), the next step was to turn the pulls for the drawers.

I suspect that if you came into my shop while I was turning, it would be like some anthropologist stumbling upon a lost tribe along the Amazon, completely untouched by civilization.  I'm self taught, and there is no doubt a better way to do this, but here goes:

I use 3/8" holes in the drawer fronts because I know that my 25mm jaws can grip this dimension.  I also know that, in cherry, I can turn  a couple of inches of this dimension without the work flexing and causing chatter.

Once I'm down to this dimension, I pop it out of the lathe and cut it in two.


Now I chuck it back into the 25mm jaws, and turn it to the final profile.


There are endless number of mushroom profiles that are accurate, and as I'm not trying to reproduce an exact piece, I just turned them to what suited my fancy.  I made them a little chunkier than usual, this being a fairly squat little table.  It was a nice tight fit, and wedges and glue followed.

The drawer rides on two runners that slide in a dado cut into the yoke.  I affix these runners with glue (as it is long-grain to long-grain), reinforced with small 1/8" dowels.  The secret to my dowels is that they are actually bamboo skewers -- tough as nails and pre-cut.


Affixing the top is straight-forward with the compulsory accommodation for wood movement across the top.  The drawer hangers are morticed onto the yoke arms, and each has four elongated holes to accept screws.  When using mechanical fixtures I often use brass insert nuts and brass screws, but as this top is only 5/8" thick, that method would risk ghosting through to the final surface.  I've also used rounded wooden pegs, glued into the top but allowed to slide freely in the elongated holes, but I'm suspicious that this might fail.  In this case I used drywall screws (I vowed I'd never do this!) Function before form in this case, and they are hidden from view.


Nothing left to do but slide the legs into their dovetails and make sure that the drawer moves freely.  Now it can take its place next to its sister the round stand, and its brother, the final stand in this series.  My original plan was to make a double drawer sewing stand, but I think I have another idea . . .

As always, just jump in with a comment if you think I'm all wet, or want to share a better method.  Oh, and questions are welcome too. 

Next up, I finally found my Stanley Miter box.  Spoiler alert --it needs work!

Sunday, December 5, 2010

Sunday ToolFoolery - A Pair of Japanese Marking Gauges (Kebiki)


After completing a large shoji screen last year, I vowed to make myself a couple of Japanese marking gauges that were robust enough to lay out large tenons.  A quick trip through the Japan Woodworker catalogue gave me some inspiration about the design, as well as a source for the razor-sharp marking knives that are the business end of this contraption.

First of all, I'm no tool fetishist.  I believe that Wharton Esherick said it best when he explained that he would "use any tool that'll do the job.  If I have to use my teeth, I'll use my teeth."  That being said, I do like the look and feel of a nice tool and I've never regretted it when I spent a few extra bucks on a high-quality item.  But tool-making for me is a busman's holiday, and I take a fast-and-loose approach.

Marking gauges (kebiki) are deceptively simple.  An arm with a marker on the end slides through a fence.  The arm is locked in the fence (thus locking in the distance of your knife mark from the edge) by means of a wedge.  I chose quarter-sawn white oak for most of the gauge because it is tough, and walnut for the wedge as it is softer and that little amount of give should help the wedge to stay in place.  I also think that walnut and oak is a really nice combination.


I also made it a bit chunky, as I wanted to be able to whack the pieces on the bench in order to loosen the wedge, adjust the bar, and lock the wedge with three easy taps.  Given the tough and stringy nature of this piece of oak, I opted to use a router to cut the two overlapping slots that hold the arm and the wedge - 1/4" and 3/8" respectively.


This also assured that the arm and wedges would protrude from the fence at a 90 degree angle. (The hand-tool gods had their revenge for not morticing by hand -- they took a big chip out of my 3/8" bit.)  Now use a chisel to make a flat shoulder where the larger arm slot meets the smaller wedge slot.

The Wedge
The wedge slips into the smaller slot.  It is important that the wedge is angled at less than about 12 degrees in order to get the right purchase.  It set this angle on my bevel gauge and cut the wedge accordingly and cut it with a coping saw.


After a bit of spokeshaving and sanding I was pleased with the result.  I then moved on to adjusting the angle of the slot in the fence.  Using the same setting in the bevel gauge, I cut a guide block to insure that the angled surface of the wedge would ride against a matching angle in the arm slot ensuring maximum contact. Now, regardless of where the wedge is placed in the slot, it will be perpendicular to the fence.


The Fence
Since I ganged up the two gauges on one board, now all that is left to do is cut out the design.  I didn't push the boat out too far with this as I went with the traditional (I think?) Kebiki outline.  Once rough shaped, I popped it on the bench for a little spokeshave action.

The Arm
The fit of the arm, the profiling of the rounded edge, and the placement of the knife in the arm are the most important parts of this project.  I first brought the thickness of the arm down (by hand) to 3/8".  I want there to be some friction as it moves, and as I've yet to round over the edge, I checked it by sliding one corner into place.  The edge rounding was done with a block plane -- a #3 round plane, a router bit with a 3/16" radius, or a scratch/bead plane could be used.  When the arm could inch along the fence, I considered it done.

To install the knife, I started by drilling a 1/4" hole, one inch from the end of the arm.  This allows you to cut a slot on only the edges the hole to fit the knife into place.  Here is where you will use geometry and physics to your advantage.


If you angle the knife by say 2 or 3 degrees (facing the arm as you will use it, this means the knife slot will angle toward your left shoulder -- for righties) the cutting action of the knife will pull the fence tight up against your work.  I cut this slot with a naked coping saw blade.  Proceed slowly, with the knife in hand.  You will only need to cut the slots a bit to guide the blade.  Insert the blade and give it a couple of taps so that it protrudes by about 1/16".  This friction fit will hold the blade in place, but allow you to remove it for sharpening.


A couple of test cuts show that it holds its line, even with the grain. The lines are deep enough to aid in making those little angled chisel cuts that allow you to get precision lines when sawing tenons by hand, and great shoulder lines on dovetails.  And having a couple of them lying around will save time resetting gauges.

If you have any questions on the X's and O's of this -- or have a better way to do things -- just make a comment.  Thanks.

Wednesday, December 1, 2010

Shaker Side Tables: Snake Handling and Drawer Making


Welcome fans of obscure Appalachian religious practices!  However, your Google search has brought you to a woodworking blog, and the snakes I'm talking about are Shaker table leg snake feet.  Also, if you hang in there, I'll punish/reward you with some blather about half-blind dovetails.

The Single Drawer Shaker Stand is the only one of the three tables in this series that does not have the classic cyma-curved leg found on the iconic Round Stand -- rather it relies on a more stylized snake leg.  As I mentioned in a previous post, the snake leg is much trickier to template rout; it has several changes of direction and there are many times that you are right up against a nasty bit of short grain.  A more sensible approach might be to cut this entirely with a bow saw or with a coping saw.  In either case, the final shaping will need to be done by hand.

While a snake leg can be finished in varying degrees of lightness on the topline, (almost an inverted "V" shape in profile) Shaker examples seem to go from dead flat at the top (no final shaping) to a soft inverted "C" shape.  I'll be creating the latter.

As I see it, you come armed with three weapons in hand to approach this task -- spokeshaves, rasps, and a sanding drum.  Oh, and sandpaper --FOUR weapons to approach this task!  The sanding drum (which I put in my lathe) is tricky to use, too dusty and not fun.  Spokeshaves are great to use, but the aforementioned short grain and tight turns make them time-consuming.  And while going straight for the rasp seems like punting on third down, it seems to do the trick for me.  Sandpaper is a necessary evil for any of these approaches.  I like to increase the amount I round the leg as I go from pedestal to foot -- leaving it flat right at the top where it meets the pedestal.  I don't draw any guidelines for registration (though I could see why they'd be helpful) and I just have at it.  This is "Free Workmanship" at its purest -- contrast this with template routing!  The above picture shows how they look at three stages of completion.

Moving on to the drawer.

For me to talk about making drawers is truly an exercise in the near-sighted leading the blind.  There are many books and tutorials that do a complete job of explaining in great detail the subjects of half-blind dovetails and drawer construction.  I've read many of them, and I'll just pass on the tips I use when I cut these dovetails.  (I'll leave the drawer hanging to another day.)

I really like Ian Kirby's The Complete Dovetail.  It is old school and explains how to go about cutting several types.  I use his method and I like the way he explains the whys of how he goes about things.  He offers no shortcuts and takes no prisoners.  Another good read is James Krenov's The Fine Art of Cabinetmaking.  This book is more about the feel of making a good joint, but he helps you to understand why you do it in the first place.  Of course, as "How to cut dovetails" is to woodworking magazines what "How to cure your slice" is to golf magazines, you can't swing a cat without finding a good magazine article.  Over the years I've tried and discarded the little jigs to guide your chisel for the final cut and boards that help you cut the shoulder square.  I'm not a purist, but they never worked for me -- maybe I'm just dim.

In the end I go with the traditional tails-first approach with a couple of well-known tricks:  (By the way, after re-reading this it sounds kind of pedantic, so please accept that this is just my experience, yours may be better and produce better results!)


The 140 Trick
Named after the Stanley block plane, it allows you to cut a small rabbet along the inside of your tails that mirrors the width of the pin board (except my 140 is a tablesaw and a tenoning jig.)  When you set it on the pin board, it registers things in perfect alignment.  It is the first line of my mantra Mark The Line. In this photo, you can see that I also bevel the hidden edge of the tails to ease in assembly.


My 4 1/2 and Tail Vice
Once "140'ed" I stick the pin board in my tail vice, projecting above the benchtop the width of my 4 1/2 plane.  I use that plane to support the tail board.  In addition, I often attach a quick clamp across the width of the boards to lock them in place.  Now I can mark the pins in a fairly aggressive manor.  Sometimes I go back with a chisel and push down on these marks so I can See The Line (the second line of my mantra.)

Cut the Damn Line
The third line of my mantra.  I try to cut the final line with my saw -- not by going back with a chisel.  For me, I can't abide picking and pecking at my mark.  The final result of chiseling (in my hands) is generally a wiggly ledge, not a crisp edge.  As I use a western saw, I bias my cut to the waste side of line.  Good technique is everything and worth practicing.  The first cut is a gentle thing, like a conductor coaxing a ppp entrance from an orchestra, not a Klitchko right cross. I haven't used a dozuki in a while.  I wonder, does the thin kerf let you start right on the line?


Abuse an Old Scraper
When cutting the pocket on your drawer front. geometry dictates that you will have a 45 degree angle on your saw cut. If you slowly advance an old cabinet scraper, hammering it down to the shoulder as you advance, you can extend the line to its full depth and make life easier.


The Leather Pad and Wooden Clamp
The first decent dovetails I ever cut were ruined by "bench rash" -- those little dings you get while you are flipping and chiseling. It is easy for bits of wood to get between the bench and the piece and  leave impressions.  With a square of leather cut from an old pair of chaps, a wooden clamp set to hold my piece, and a brush, I can make pretty quick work of clearing the waste without ruining the piece.


Stick With A System
None of the above is gospel, and some of it may be dead wrong!  But it is my system and I'll stick to it.  My results are good, but they only progressed from bad to pretty acceptable when I just repeated things. (The above photo shows the first stages of planing the drawer side.  The cracked board you see is a backer board since this drawer is a "push-me-pull-you" with two fronts, which dictates that in order to follow the grain of the drawer side, you will have to go the "wrong way" on one drawer front.  The backer board prevents blowout.)  If cutting dovetails is new to you, faff around for awhile, delve into the resources, get a feel, then commit to a system.  I'm hoping that over time, my results will be what I want them to be -- I'm still a work in process.

I'd love to hear about any great tips or techniques that work for you, so please feel free to post them in the comments.  Meanwhile, I promise to put this thing together next week and talk about a change in plans for the final table in this series.