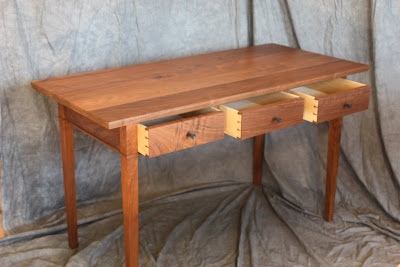
With the drawers and base completed, and the top glued up and ready, all that was left was to decide on an edge trim, finish the top, and fiddle with assembly. I wanted the edge trim to complement the simple lines of the piece, and as the top itself was large (23"x 54"), any routered edge would have to be done with a hand held router and take into consideration that I would be dealing with end grain.
I cut the ends and finished them with a low angle jack and hoiked the top on the tablesaw to make the two long sides parallel. I decided that a wide cove on the bottom of the edge, with a 3/8" fillet on the top would be nice, but I don't have a set of hollows and rounds (yet) so I thought I'd cut a 10 degree chamfer on the bottom edge, leaving a 3/8" fillet on the top, on the tablesaw. And for a brief moment I began to hate the project.
Why? Because I'd somehow moved from crafting a piece of furniture to machining a piece of furniture -- two totally different things. I slowly lowered the top and stepped away from the machine. Minutes later I had constructed this haphazard board jack and I was on my way.
It took all of 30 minutes to hand plane subtle and accurate bevels on all four edges. It looked good and I felt much better. I chose to attach the top with the tried-and-true-wood-buttons-in-slots-method I normally use on table tops.
The finish was two coats of dye with three coats of poly, all hand applied with a bit of rubbing down with a synthetic pad between coats. I think it has a nice in-the-wood look.
What would I change? I definitely found that the possesion of, and expertise with, hollows and rounds would have allowed me to do a more subtle edge treatment. I am always working to refine my internal carcase work with regard to drawer infrastructure, and I think one more groove in the web frame would allow me to inset the drawer guides without fasteners. As it wasn't a cross grain situation, I used inset brass screws. I also think that this is about as large as I want to go without stretchers for the legs.
On the plus side I want to mess about with a gallery, a fancy burled walnut/black leather blotter for future desks, as well as entertain the idea of a burled walnut veneer top with attached edge treatment to add interest and eliminate end grain. So, a few pictures before it leaves for its final home:
Any questions? Any answers?


This is a beautiful desk! Nice choices of wood grain, well done!
ReplyDeleteDavid
David-
ReplyDeleteThanks for the kind words. I actually built the desk around the board that became the drawer fronts. You can see the curl figure on the far left drawer.
I think the next desk like this I do will be a touch bolder. Upon reflection, the Gilberte desk stands right between traditional and contemporary design. I'm fascinated with Japanese furniture and I'd love to incorporate some of those details in a minimalist design. It could be nice, or it could be aesthetic train wreck!
I think I could write the great Canadian novel sitting at a desk like this. Beautiful!
ReplyDeleteTui