 | |
| A Lutyens Bench peeks out from among the yews at Sissinghurst in Kent |
But among American gardeners and furniture-makers, we are most familiar with his eponymous bench. To me, the style seems to combine the ordered design of Thomas Chippendale's Chinese furniture with the arts and crafts cloud lifts of Greene and Greene. The challenges to building the piece are that it works best on a large scale, and that the construction process is fairly complicated -- requiring nearly every tool in my shop and taxing every muscle in my body.
Right from the start I made two decisions. As my head was wrapped around an original design that I was building, and I wanted to nail the curves without too much frustration, I purchased ready-made plans for this particular project. Available though Taunton Press, these plans turned out to be $20.00 well spent. Printed on thick glossy paper, with accurate dimensions, this is a great jumping off point. In addition, I decided to build the bench in white oak. The white oak is, in many ways a compromise, but teak was out of the question, and 8/4 cedar and cypress were not readily available. Research on finishes, and the advice of some artisans I trust, has led me to believe that I can make the oak viable over a twenty-year life.
Building the Templates
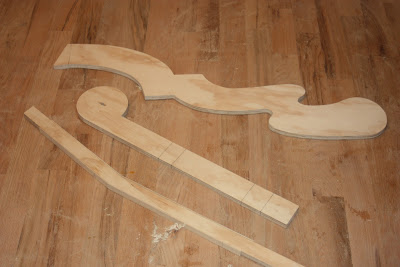
Taunton's plans include full-scale drawings of the most difficult components. I traced these onto a sheet of my over sized printer paper, and made plywood templates of the crest rail, front legs, rear legs, and seat rails. In order to get a perfect circle on the top of the front rail, (the lollipop) I drilled a hole in the center and cut a 3" radius circle on the circle-cutting jig at the bandsaw. In fact, if you can keep this set-up intact, this will be the best way to cut the actual legs.
For the angled rear legs, I cut a single 11/2" plywood strip, then cut it into two pieces in a modified scarf joint, that gave me the proper angle. As I've done in the past, I achieve straight lines by hot-gluing a thin 1/16" strip along any plywood edges that I have to cut freehand.
This design lives or dies by your ability to replicate the signature crest rail. I set aside an entire afternoon to creating this template. I started at the bandsaw and finished at my bargain-basement Grizzly portable spindle sander. As you can see, I left the template long so that I can start and end my router passes without encountering end grain.
Cutting The Crest Rail and Front Legs
Once the crest rail template is complete, I trace the image on the 8" wide 8/4 oak stock. To ease the transition through the tight curves I drill 1" holes right to the line.
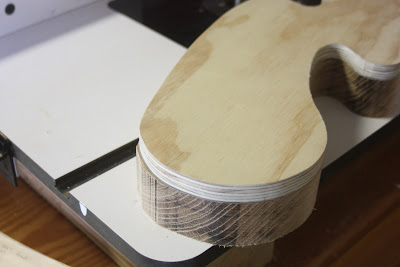
I cut very close to the line on the tight exterior curves in an attempt to minimize catastrophic tear-out at the router table. Plan B was to sand and around these difficult bits at the first hint of a blow up, but things went well so I routed the entire piece.
As you can see, there is a trade-off around the speed at which you rout (too fast and you risk tear-out, too slow and it burns.) I generally opt for too slow as the final sanding removes any burned material. Through a combination of spokeshaving, hand-sanding, and spindle sanding, I come up with a final surface.
In order to achieve a snug fit with its mirror image, I use a T-square to align the joint perpendicular with the horizontal edge of the crest rail. This is cut most easily at the miter box.
The front legs are best cut by squaring the inside long edge and then referencing this face on the bandsaw up to the "lollipop." Then attach the leg to the template on the circle-cutting jig and finish the cut. This avoids potential end grain disasters.
With the two tricky curved components complete, it's time to focus on the rear legs and the base. And we'll tackle that in the next post!


This is a cliffhanger! The bench, the bench!
ReplyDeleteYou do nice work and I appreciate your sharing of technique and experience.
ReplyDeleteI have the same model miter box but it is missing one of the bearings that support the saw back. Do you by chance have one or know where I might find one?
Thanks for the nice comments. Gary, I can only guess that eBay would be the best option. I can see why it would go missing as the nut on the bottom of mine needs regular tightening. Sadly, I suspect you'll end up buying a whole new set-up -- which won't be too bad unless some magazine has recently written an article about miter boxes and the market price will have doubled.
ReplyDeleteI will be watching. That bench is a project I would like to tackle some day.
ReplyDeleteThis comment has been removed by a blog administrator.
ReplyDeleteThis comment has been removed by a blog administrator.
DeleteThis comment has been removed by a blog administrator.
ReplyDeleteDid it ever occur to you that the rights to this bench might remain in the Lutyens family, which they do? It might have been polite to ask permission and, if granted, you would have been given access to a full set of working drawings.
ReplyDeleteYou may take heart from the fact that you are not alone in helping yourself to this design and the result looks better than many but the bad manners of this copying could have been avoided with a little bit of research.
Candia Lutyens (granddaughter of Sir Edwin Lutyens and holder of intellectual property rights to his designs).
As I PURCHASED these plans from Fine Woodworking, and built the bench for my own personal use, your objections are flatly invalid. If you have a complaint it should be with Fine Woodworking who openly market these drawings. I admire your grandfather's work, along with his collaborations, but benches of this style (bearing his name)are produced by the thousands.
DeleteHello Cristóbal , por favor podrías ayudarme como conseguir la forma de poder comprar los planos de este banco, dirección, teléfono o nombre de la empresa,, anticipo mi agradecimiento por tu apoyo
DeleteY comprensión
great post, this looks very easy to inspire, in understand
ReplyDeleteI have loved the Lutyens bench since I first laid eyes on it! I however am not a seasoned woodworker and mortise and tenon joints scare me to death....I can see a melt down in the making! I am trying to figure out a way to make a chair in this design, only easier!
ReplyDelete