Saturday, January 30, 2010

A Shoji Inspired Screen -- Designing and Cutting The Lattice (Kumiko)


There is a dramatic shift from the heavy, nearly timber-frame, work of the rails and stiles to the light and flexible construction of the kumiko.  At last, my hand tools seem in proportion to the project and I could set out at a relaxed pace.  The individual pieces would are 3/4" wide by 1/2" thick.  I thicknessed the oak board to 3/4" and cut 1/2" slices on the tablesaw.  With these two operations complete I moved out of the "shop" and into the studio.

For aesthetic reasons, I wanted an odd number of panels in each direction.  I went with five-by-five (keeping the same number of panels in each direction makes each panel proportionate with the entire piece.)  This is where a story stick is a must.  The internal dimesions were 58 1/8" by 70 7/8".  Subtracting the width of the four kumiko (that divided each dimension into five panels) reduced each by 3" (4x 3/4").  Dividing this by five gave me panels that were 11.025" by 13.575".  I threw in the towel on the Imperial measurement system at this point and converted to metric, giving me 280 mm by 345 mm.  I cut a stick each of these lengths, and in combination with a 3/4" measuring block, stepped out these measurements on a longer story stick.  I will use this to mark the half-laps on both the kumiko and the frame.

I ganged together the kumiko (first the verticals and then the horizontals) and marked them together.  If I were using a dozuki I would have cut them at this point as well, since the thin kerf holds well in even a knife mark.  As I am using Western saws, I will cut them individually (more on that in a moment.)

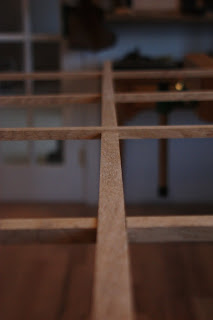
There are several traditional ways to arrange the kumiko in the frame.  The most simple is a series of half laps, all on the same side of each of the horizontals and verticals (flat weave).  To assemble you just lay down all the verticals with the half laps up and set the horizontals on top, half laps down.  The result looks something like this:
If you alternate the half laps on one piece, but keep them on the same side of the other, (allowing you to weave the horizontals through the verticals in an alternate stick weave) it looks like this:


And still a third way is to alternate both the horizontals and verticals to get what is called an alternate lap weave.  It is the most complicated as the joints are cut on alternating faces on each piece.  It also gives you the most stability.  Alas, as I was making only two grids, I made only the first two patterns.  Now, from the side from which you will be cutting, mark the depth of each joint with your gauge.  As this is 1/2" thick, the half laps will be 1/4" deep.


The only thing remaining was to cut the individual joints.  What can I say?  If you like this sort of thing, this is just the sort of thing you will like.

The essence of all joinery is so simple -- determine the line, mark the line, cut the line.  Master these three elusive steps and your days will be happy ones.  This following method of cutting the kumiko brought me as close as I can get to joinery Nirvana.

Begin by exagerating the knife marks with a chisel and then cut the little indentations (from the waste side) in which to rest your saw blade.  This not only ensures that you cut on your mark, but it places the set of the teeth below the surface, giving the joint a razor edge.


Cut to your depth on each side.  Depending on your temperment you can chisel every joint as you cut, saw the joints on one kumiko and chisel, or do all the sawing and then all of the chisel work in one go.  Removing the waste is a two step process.  Your first cut removes most of the waste and your second cuts to the line.  As you probably know, the geometry of a chisel makes it that when it encounters too much resistance, it moves back from the bevel edge, "overcutting" the line.  If you are taking only a sliver (less than 1/16") it will stay true.


For me, this kind of work hits the sweet spot of hand tool work.  Sure, you have to concentrate, but your mind is free to listen to Haydn on BBC Radio 3, put on a Tom Waits CD,  or sing "Love Potion #9" at the top of your lungs.  Once completed, the kumiko snapped together quite easily.  The slight wood movement that occurred after cutting actually put the whole grid in tension and held it in place.

And to top it off, I was rewarded with one of the most spectaclar "moonrises" I've ever seen out of the shop window.


Monday, January 25, 2010

"Relic-ing" A Tele - A Bit of Fun


I've always had complicated relationships with guitars.  In college, I sang in a band and I still remember the lead guitarist giving me the "Son, put that thing down or you'll hurt somebody" treatment.  My best friend and bass player went on to win a grammy as a sound engineer, and I went on to take voice stuff more seriously and struggle with the instrument.

A parade of guitars have passed through my house.  The good ones (Ric 325, Gibson Nighthawk) usually ended up being sold when I needed the scratch.  The bad ones tend to hang around forever (Sigma DR-35).  I do still have my American-made Strat, and I have no reason to need another.

Yet, in a recent assault on the fortress of Mel Bay (blues scales in five positions!) I got the itch.  An ES-335, not a chance.  Maybe a Godin Archtop? Probably not  And while I couldn't justify a guitar for me, my younger daughter only has an acoustic, so we really need a second electric (I say, keeping a straight face.)

Enter the Grizzly fake Telecaster kit.  A fun project, a guitar that she can take to her scream-o band practice, and a chance to fantasize about being Springsteen, Joe Strummer, Keith Richards or Albert Collins.  After some jousting about the color, (I wanted butterscotch blonde, she wanted black) we settled on Surf Green and got started.

Let me be clear that this is not about any real luthiery work; this is mostly an excercise in finishing.  If you'd like to learn more about real instrument making, check out Khalaf Oud Luthiery .

The very helpful Guitar Reranch site gave me a sense of what I wanted to do, and a look into the cult and controversy of building, distressing (Relic-ing), and tricking out guitars.

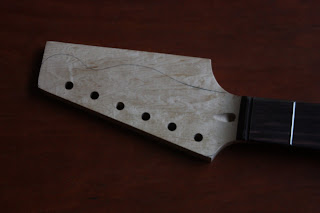
The first and only real woodworking is the design of the headstock, and I've replicated the classic Telecaster look.  Draw the profile, cut, smooth with a spokeshave, sand, and set aside.  The biggest challenge was keeping the maple neck dust off the rosewood fretboard


Moving right to the finish, it seems that this is a cross between french polishing and auto body repair.  The steps include sanding, filling the grain, applying a sanding sealer, priming, painting, and then an application of clear coat.  However, like many woodworkers I know, this is all new to me.  I tend to stay in the shallow waters of hand applied finishes -- shellac, dyes, oils, and wiping varnish -- avoiding the rough seas of spray guns and lacquers. 

The common theme of all the finish steps seems to be "somewhere in-between."  The grain filler needs to be applied, then wiped off "somewhere in-between" the time that it is wet and the time that it will adhere within the grain.  The spray finish (from a can) needs to be applied at a rate "somewhere in-between" it starting to sag and it drying in the air (and becoming overspray.) That means that unless you are brighter than I, or very lucky, there will be mistakes.  I opted to go for the more-leaning-toward-overspray approach and applied the sealer over the filler.


As you can see, the finish after this step is "somewhere in between" a shiny finish and a nappy one.  Is this correct?  I don't know.  If you consult the internet you will get conflictng answers.  The Randall "Tex" Cobb look-alike guy in the house trailer says it doesn't matter.  The guy from the set of "Wayne's World" seems to think it does.  Who knows?  As this is my first attempt, I will  leave some as it is in the picture and spend 15 minutes on another area getting it glassy smooth and see if it makes a diference.  We will be distressing this so I can cover any blatent errors down the road.

As it hangs in its makeshift spray booth, covered in primer, it looks like one of those cheesy haunted house displays -- "This is what the devil will do to you if you play Rock and Roll!"


By the way, I haven't forgotten the Shoji screen.  I'm just looking for distractions.

Friday, January 22, 2010

You Are The Shoji Tenon to My Mortice


When I was in culinary school, there were certain dishes that you cooked solely for the exercise of doing it right.  They weren't tasty, I rarely saw them on a menu, but they magnified any errors in technique you might have (Paris-Brest anyone?)

Cutting good tenons is woodworking's version of this little drama.  Done right: nobody notices.  Done poorly: your credibility is called into question.  With the mortice complete it was time to fashion the matching tenons for the screen.  As luck would have it, Fine Woodworking's web page just addressed this subject.  So if you want a more comprehensive procedural from real teachers, you can take a look over there.

Square stock, crisp marking, and solid methods of work are all that are needed for success-- which means that it is not always as easy at it seems.  My method is as follows:

1.  Using a cutting gauge, (or a second marking gauge) determine the length of the tenon from the stock into which it will be morticed.  I aggressively mark a deep line on all four sides of the stock -- the deeper the better.

2.  If I've been thinking straight, I will not have touched the setting on the original marking gauge from when I layed out the mortice.  I mark the end of the stock and the cheeks up to the line of the shoulders.


And now the party piece (outlined in a 1905 Industrial Arts textbook and in the new Fine Woodworking article.)

3. From the waste side, push your chisel into the deep cut line to form a 1/16" little groove to start your saw.  This will ensure that the saw will not jump around when you cut the shoulder and will result in an accurate, crisp joint.

4.  Cut the shoulder down to the cheek line.  Remember that it will take a bit more force as you are cutting the entire width right from the start, as opposed to attacking the work from an angle.

Now, if I had a tenon saw with a sawplate wide enough to cover the 3 1/2" tenon I would angle the rail in my vice, cut the cheeks from each side and be done with it.  As I do not, it was a tricky little cut on the bandsaw. (Tricky because it is a pain to hoik this big piece onto the saw, but it does get the job done.)

5.  Smooth the cheeks down to the lines.  It is (obviously) important to do this before you cut away the haunches(?) on the sides, as they carry the lines that mark the thickness of the tenon.  I find that starting with a wide chisel, following with a block plane, and finishing with a card scraper is the way to go.  I like the cheeks to be shiny.


6.  Cut away the haunches and begin test fitting.  With a joint this big it means test, fiddle, test, fiddle.

If I have a pet peeve about instructional books, it is when they place a large photo of the main point of the book on the front cover, and then fail to demonstrate the technique.  Shoji: How To Design, Build, and Install Japanese Screen shows a nice M&T joint with the added flair of a little 45 degree angle.  It looks nice, and I suppose it has some function, but you'd never know that from reading the actual book.  I decided to work through it on my own.


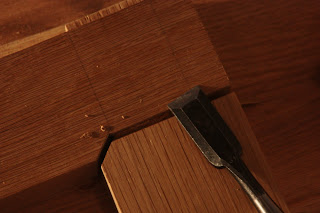
I started by marking a line 1/2" down on the stile, where it meets the rail.  I then drew a line from the width of the rail down to this line at a 45 degree angle.  Backsaw, bandsaw, chisel, card scraper down to your lines.  using the stile as a template, mark the rail with the little 45 degree angle cut needed to mate with the stile.


You can see that I used the offcut from the cheek of the tenon (sticking out at the right) to shim the stile up to the level of the rail.  Mark, cut, chisel to the line.  Ther's no way around it now, it is time for another test fit.


Now that it is this far along, you can pull the joint apart just a bit to make any necessary adjustments.  As you can see, this addition to the M&T narrows the screen by 1/2" and places the through tenon out 1/2" (as seen at the top of the photo.)  This will have two wedges driven in and trimmed.  But that's for another day as I'm losing the light.  The finished joint takes shape.


Next up, the lattice and wedges.

Monday, January 18, 2010

A Shoji Inspired Screen -- A Hybrid Approach


I have a little ritual that I go through with my local librarian.  When I bring a book to the desk, she looks down at the title, (Pigeons!, Lord Krishna's The Art of Indian Vegetarian Cooking, The Compleat Squash: A Passionate Growers Guide) and like Jeeves inspecting a particularly colorful pair of spats that Bertie Wooster has picked up at the Burlington Arcade, her lip quivers, her expression remains unchanged, and she slides it back at me.

"Three weeks."

Her reaction was the same to Shoji:  How to Design and Install Japanese Screens.  And while this book lands somewhere between being the definitive guide and being not too useful, it was what was available through my library system.  I suspect that it would be a good complement to books available by Toshio Odate.  Nonetheless, it was enough to get me started on the sliding, insulated door that I had in mind for my next project.  Unlike traditional shoji screens this door would not be translucent.  It is designed as a door to divide spaces in a basement -- isolating heated space from unheated space.  In the place of rice paper will be (rice paper covered?) 1/2" rigid insulation.  Also, I plan to suspend it on housed roller hardware, similar to a barn door.  The material is white oak, the method will be a hybrid of hand tool and machine techniques.

One of the main challenges, right out of the gate, is the sheer size of the components.  The rails and stiles are roughly 5'6" by 6'6" and I'm looking for the stock to finish around 6/4".  Using only machines to cut the mortices and tenons would present a challenge, and I realized that in some cases I don't quite have hand tools that are robust enough to tackle these big joints.  So I will improvise.

I started with rough 8/4" stock and employed a hybrid approach to the dimensioning.  A quick going-over with a #5 1/2 plane on the high ends of the faces of the stock, followed by several passes across the jointer prepared each piece for the thickness planer.  I brought the components to within 1/8" on one day, and three days later, after things had settled down, passed both sides through the planer to 6/4"  Because of the weight of each piece, it was important to support the stock on both ends as it entered and exited either machine.  The edges of the stock were planed by hand, then cut to width (rails: 3 7/8", stiles: 3 1/2") on the table saw and the rough edges planed again.  The sight and smell of a sharp card scraper on the faces of the white oak, to acheive the final finish, was a welcome respite to the noise of the machines.


For aesthetic reasons, and because I can get away with it in oak, I decided to make the mortices about 3/4" wide.  While slightly non-traditional, I have a system for cutting mortices that gives me good results on oversized work (since I do not have a 3/4" mortice chisel.)  Feel free to discard this if it doesn't work for you.

1.  Determine the length and center line for all mortices and mark them (go pretty deep with your marking knife on the outside dimensions to save yourself some anguish later.)


2.  Take the stile to the drill press and place a support level with the table.  As you see here, I use a two foot level to ensure that any hole will be straight.


3.  Using a 3/4" forstner bit, align the piece so that the tip of the bit enters the center line of the mortice.  The edge of the bit should just touch the outside dimension of the mortice.  On a slow speed begin drilling.  A forstner bit only works when it can expel chips effectively.  Once clogged it becomes just a spinning, overheated cudgel -- so on the first full holes withdraw the bit and clean it often.  Once you have drilled through halfway, slide the piece down to the other end of the mortice and repeat.  Now go back and drill out the middle bits.  As these holes will adjoin other holes, the chips will exit more easily and things will go faster.  Flip the piece and repeat, breaking through the mortice in the middle.  When you are done, it will look like this:


4.  Now take your gauge and check how far from the faces your hole begins on each side.  In a perfect world a 3/4" hole in 6/4" stock will leave you 3/8" on each side. So set your gauge to 3/8" and see if you can scribe a line along the edge of each set of holes -- chances are you will need to reduce this width a hair so that you can scribe a solid line on each side.  For the sake of consistency I like to check all mortices, find the setting that will work for all, and scribe this line on every mortice.  You now have a consistent size for every joint.


5.  By any means at your disposal, chisel out the mortice.  White oak is tough, but sometimes stringy.  Deep lines, scribed and followed by a chisel can stave off disaster.  As I true the walls I like to think that I'm biasing them a bit to the inside (undercutting) when I do that they come out close to square.  For the final cuts I like to angle the chisel to take a shear cut along the edge.  A good skew chisel would be great, if I had one.


Shoji making is an art with hundreds of years of tradition.  I hope that this approach is not being disrespectful to the craftsman who do it properly, but I'm pleased with results so far.  I will be doing some things to this joint to raise it above a simple M&T, but for now, this will be good and I will proceed to cutting the tenons.


Wednesday, January 13, 2010

A Bookbinding Press . . . And a Look Over My Shoulder


As part of my older daughter's Christmas gift, I promised to assemble and make the items necessary to bind books.  The backer board, paper and adhesives had the good manners to arrive under the tree on time, but this little project stubbornly remained on the drawing board.  But when I realized that I might get some use out of it as well, (like the Rick James album I got my then girlfriend, now wife back, in 1982) I got straight to it. Suddenly, I thought of many things that could be pressed (veneered drawer fronts, wild flowers, my enemies' heads.)

It was just a lucky coincidence that my daughter started her first project in the studio as I got this underway.  Little did I know that it would be a lesson in both parenting and the nature of craftsmanship.

The press itself is pretty straightforward.  If you look at any bookbinding supply place  (Hollanders) you will see them offered at steep prices.  Two boards are separated by four posts.  A veneer screw is suspended in the top board so that it can be turned to press down on a platen, in turn sandwiching the item in question against the bottom board.  I chose four 1/2" carriage bolts (10" long) as the posts.  Not pretty, but useful.  Scouring the shop I found some 3/4" plywood and OSB that would also come in handy.

Meanwhile, my daughter began making her book  -- a book that could be made without the use of a press.  It was fascinating to see the way she just dove into the project.   She's not an industrial arts kind of girl and she clearly had little respect for rulers, directions, or my input.  Seventeen years of parenting her have taught me to stay out of the way when she is in full flight like this but I began to see storm clouds on the horizon . . .

At my end of the bench I set about gussying up the OSB.  Having recently put down a hardwood floor in my shop, I have plenty of white oak flooring around and anything that doesn't move quickly enough is apt to get covered with it.  After sizing the OSB (one board slightly smaller in both dimensions) I affixed the oak with drywall screws.

I then stacked the smaller board on top of the larger and centered it.  I measured in an inch or so from the corners and drilled 1/2" holes for the carriage bolts in both boards at the same time (ensuring that the bolts would fit.)  With a larger forstner bit I countersunk the holes on the underside of the bottom board to house the bolt heads and covered it with feet made of, (you guessed it) white oak flooring.  This gives the press a firm base and keeps the bolts from dropping down when the press is idle.


. . . North Bennett Street School doesn't offer a full concentration on bookbinding because it is easy or intuitive.  It seems that in my daughter's haste to get going she used the wrong bookcloth to bind the backer boards together.  The stuff she used was kind of like stiff gauze.  And when she did choose to ask my advice, she was visibly disappointed that I didn't have some 500 years of bookbinding knowledge in my head.  "No big deal," I said.  "We can just start over."  That wasn't happening.  Sensing what might come next, I put some space between us.  She pushed on . .

I made a vow this year to fashion my jigs in a manner that makes them more like furniture and less like Frankenstein's monster, so I created some white oak strips to edge the boards and hide the OSB.  I glued it up, drilled 1/4" holes a couple of inches into the substrate, and rammed home doweling.  I even went so far as to turn a 9/16" rod of oak to make plugs for the screw holes.  (Note to self, always countersink to a dimension that matches doweling that is readily available.)


The last step was to drill for the veneer screw.  Outlined on the instructions (that I tossed) it said to drill a 1 1/8" hole.  I do not have a forstner bit of that size so I did a little ignoring of proper procedure myself and used a file to enlarge the 1" hole, employed a bigger hammer, and in one mighty death-or-glory whack seated the screw collar.  This little brute would get no finish. It is, after all, just a fancy jig.


With cat-like tread I decided to check on the goings-on at the other end of the bench, and to my surprise, she was smiling.  Somewhere along the line my daughter had rallied and the project was complete -- without my help.  Imagine that.  No, it wasn't perfect, but that wasn't the point.  Someone who doesn't normally make things (her creative outlet is writing) had built something useful.  And without milking this too much, I realized that all the experience and skill you gather as work your craft can make you forget that feeling you had, early on, when everything you did exceeded your expectations.

So that's my resolution in the shop for 2010 -- to take pride in the effort, and to realize that all results are subjective; it just depends on how you measure them.  Next up, a Shoji-inspired door.

Sunday, January 10, 2010

A Contemporary Jewelry Making Cabinet -- Down The Chimney It Goes!


Now that the drawer boxes are complete, I was at that last, sweet stage of a project where the end is in sight.  It is here that I get the most satisfaction, and conversely, it is the time that I have to guard against taking some lazy shortcut to get to the finish line.  I combat this tendency by creating some fiddly task that forces me to keep my concentration.  In this case it is the drawer pulls.

A quick trip to the back room of Groff & Groff Hardwoods netted me a tasty piece of birdseye maple.  Because I was looking to create small components (drawer pulls) I needed a piece with some great figure, not consistent figure.  That made the six foot by six inch board I found quite reasonable.  I started by cutting a one inch strip and then planing an angle on two opposing sides to create a long isosceles trapezoid shaped blank.

I measured six equal lengths for the pulls (in this case 3 1/2") and marked the centers of each pull.  Then, before cutting, I drilled holes for a 1/4" dowel that will affix each pull to the door.  Only when I've inserted 2" lengths of dowel into the holes do I cut the pulls.  It is just easier to work with the larger piece.


By using my miter hook to cut 45 degree angles one the end of each pull, perfecting the angle on the shooting board, and finally planing tiny chamfers on each edge, I arrive at the final shape.


I marked the centers of the front of the drawers and drilled for the pulls.  In hindsight I'm hoping that a single 1/4" connection will be robust enough to keep it square.  Time will tell.  One quick tip.  As you test fit these pulls to check that everything is going to plan, make sure that you push on the dowel itself to remove it from the drawer front.

A friend of mine once snapped off one of the dowels by yanking on it really hard and I wouldn't want that to happen to you!

I toyed with a number of options for the top.  When I started this project I was planning to use this whacking big maple burl, sanded and polished as a work surface.  It is a spectacular piece of wood.  But as this is a functional piece designed for the studio, I went with a more utilitarian option -- maple plywood edged with birdseye maple.  It is flat, large, easy to construct, and I won't cry if an errant hammer blow defaces it.  The construction was a simple miter, biscuit and glue job.

My first choice of finish for cherry is generally Tried and True Original Wood Finish -- but it takes several days to apply and cure.  My second choice is Danish Oil, and in 30 minutes the finish was done and it was ready to go under the tree.  A few more photos:


I want to give a special thanks to Tom Fidgen for allowing me to crib, shamelessly, from his original design.  I do encourage you to buy his book, Made By Hand.  (We vegetarian, guitar-playing, woodworkers have to stick together!)

Next week I'm making a little one-off bookbinding press that I hope can also be used as a veneer press, and then I leave the forgiving world of cherry for a large project in White Oak.  Be seeing you.

Wednesday, January 6, 2010

A Contemporary Jewelry Making Cabinet -- The Drawer Dummy


It may come as a surprise that this term "Drawer Dummy" refers not to the maker, but to a jig -- a jig that I found essential during the next step of the project.

With the frame complete, it was time to build the six drawers for the cabinet.  Drawer making is one of my favorite activities (as opposed to drawer fitting, which I loathe.)  Completing hand cut dovetails gives one a sense of satisfaction, a feeling that you are working your craft.  But with four days left before Christmas, I knew that it was not going to happen.  Recently, Fine Woodworking # 208 featured a cover story about pinned, rabbetted drawers, so I decided to give them a whirl.

I machined the cherry drawer fronts to 3/4", the backs to 5/8" and the poplar sides to 3/8".  The drawer heights matched those from Tom's plans for project five in Made by Hand.  I rabbetted the drawer fronts and backs on the table saw with a sled and a tenon jig to match the width of the sides.


Dovetailed drawers assemble quite easily and are kind of self-squaring, these rabbetted drawers are not so cooperative.  Thus enters the Drawer Dummy.  By cutting and stacking a couple of pieces of mdf that are about 1mm smaller in width and length than the internal dimensions of the drawer, you create a template that allows you to glue up the drawer, hold it in place while you drill the pins, and plane it to fit during final assembly.

I first glued up the drawer box fitting it around the Dummy, clamped it, and slid on the drawer bottom (plywood, edge rabbetted, in grooves.)  You can check it for square, but the Dummy ensures that it can be no more than 1mm out of square.  After 30 minutes I removed it and moved to the next drawer.  If you look at the photo above, you will see that I put a bit of packing tape on the corners to prevent the drawer from affixing itself to the Dummy.

With six drawers, this will take the better part of an afternoon.  When the sun rises again you can begin inserting the pins.


The number of pins in each drawer increased as the drawer size increased in a pattern of 2, 2, 3, 3, 4, 4.  I first marked a line on each drawer side that ensured that the pin would be centered in the drawer front.  Using a set of dividers I determined the placement of the pins along this line.  It's very easy.  If you want two pins, you set your dividers to take three steps along the line, giving you two marks on the drawer.  Three pins requires four steps, and four pins five steps.


There is nothing fancy about the next step.  Store bought dowels were inserted into holes that were drilled by hand, glued and left to dry.  Remove the excess dowels with a flush cut saw.


At this point I like to go for a trial fit.  During the glue up of the frame (when last we spoke it had been dry fit) I installed drawer guides on the drawer side rails.  As it is winter, I wanted the drawers to slide along with a bit of play, accounting for the increased humidity of summers yet to come.  A little work with the low angle jack (my go-to plane on softer woods like cherry and poplar) and we had a nice fit.


Ok, that just leaves knobs, top, and finish to go.  I might just finish on time.

Saturday, January 2, 2010

A Contemporary Jewelry Making Cabinet -- Part II


Once the shape of the legs is complete, the next step is to build the frames that will hold the drawers on the sides and front. 

A quick program note.  For the most part, this project is outlined in much better detail in Tom Fidgen's book, Made By Hand, so I'm not going to go into an exhaustive blow-by-blow on all of the joinery and construction.  If you like this style of furniture you would be well-served by owning a copy (and for the record I bought the book with my own allowance!)

As I mentioned, the mortices were already cut for the upper and lower rails that hold the four legs together before shaping.  The lower rails and the upper side rails are just bog-standard mortice and tenon the top front and rear rails incorporate a dovetail on the top.  This is pretty standard table construction, and Tom outlines his variations in the book.

This cabinet will incorporate six drawers and the drawer infrastructure (as well as the drawer sides) will be exposed.  I riffed a bit off the original joinery to create a sort of miter/haunched joint to attach the drawer front and side rails.


As the frame is square, the shoulder-to-shoulder measurements for all rails is 14" with an 1" for tenons, giving a total stock length of 16".  I find that well-selected common stock is great for these parts of a project as you can cut around splits, checks and knots to get these smaller pieces.  As you can see, the joinery is pretty lightweight -- it is not designed to provide structural support, just to hold small drawers.


While the front of the rails attach with the miter joinery, the back attaches with a simple mortice, which brings us to the tricky bit of this part of the project.  As the legs change dimension on the outsides from top to bottom(because of the shaping), the reveal of the side rail will change accordingly.  And as it is fixed by the miter joint in the front, you need to know how much to trim off the outside of the rail in order to be consistent in the reveal and keep a ninety degree angle between the front and side rails.  My method to find the right place for the back tenon, as well as determine whether to change the width of the rail is as follows:

1.  Place the front rail in the mortice of the front leg and then the side rail and make sure they are at a ninety degree angle.  Note the distance that the side rail sticks out from the side of the leg with a gauge.

2. Line up the back of the side rail with the back leg and use the gauge to set the distance that the outside of the rail will stick out from the back rail.  Holding that distance in place, mark where to cut the tenon on the back.

Once you have done this, each side rails will awkwardly meet the legs with a different amount of reveal.  Decide how you want them to meet (I chose about a 1/16" gap) and plane to proper size.  A quick trip in the time machine allows me to point this detail out at a point in the future!


Anyway, now that the 18 rails have been cut, fitted, and fiddled with, I can dry fit the frame.  So far, so good.


Next, drawer making takes center stage.