When I was in culinary school, there were certain dishes that you cooked solely for the exercise of doing it right. They weren't tasty, I rarely saw them on a menu, but they magnified any errors in technique you might have (Paris-Brest anyone?)
Cutting good tenons is woodworking's version of this little drama. Done right: nobody notices. Done poorly: your credibility is called into question. With the mortice complete it was time to fashion the matching tenons for the screen. As luck would have it, Fine Woodworking's web page just addressed this subject. So if you want a more comprehensive procedural from real teachers, you can take a look over there.
Square stock, crisp marking, and solid methods of work are all that are needed for success-- which means that it is not always as easy at it seems. My method is as follows:
1. Using a cutting gauge, (or a second marking gauge) determine the length of the tenon from the stock into which it will be morticed. I aggressively mark a deep line on all four sides of the stock -- the deeper the better.
2. If I've been thinking straight, I will not have touched the setting on the original marking gauge from when I layed out the mortice. I mark the end of the stock and the cheeks up to the line of the shoulders.
And now the party piece (outlined in a 1905 Industrial Arts textbook and in the new Fine Woodworking article.)
3. From the waste side, push your chisel into the deep cut line to form a 1/16" little groove to start your saw. This will ensure that the saw will not jump around when you cut the shoulder and will result in an accurate, crisp joint.
4. Cut the shoulder down to the cheek line. Remember that it will take a bit more force as you are cutting the entire width right from the start, as opposed to attacking the work from an angle.
Now, if I had a tenon saw with a sawplate wide enough to cover the 3 1/2" tenon I would angle the rail in my vice, cut the cheeks from each side and be done with it. As I do not, it was a tricky little cut on the bandsaw. (Tricky because it is a pain to hoik this big piece onto the saw, but it does get the job done.)
5. Smooth the cheeks down to the lines. It is (obviously) important to do this before you cut away the haunches(?) on the sides, as they carry the lines that mark the thickness of the tenon. I find that starting with a wide chisel, following with a block plane, and finishing with a card scraper is the way to go. I like the cheeks to be shiny.
6. Cut away the haunches and begin test fitting. With a joint this big it means test, fiddle, test, fiddle.
If I have a pet peeve about instructional books, it is when they place a large photo of the main point of the book on the front cover, and then fail to demonstrate the technique. Shoji: How To Design, Build, and Install Japanese Screen shows a nice M&T joint with the added flair of a little 45 degree angle. It looks nice, and I suppose it has some function, but you'd never know that from reading the actual book. I decided to work through it on my own.
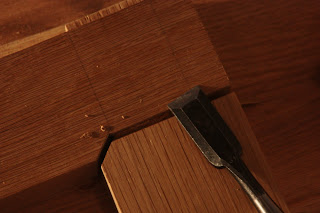
I started by marking a line 1/2" down on the stile, where it meets the rail. I then drew a line from the width of the rail down to this line at a 45 degree angle. Backsaw, bandsaw, chisel, card scraper down to your lines. using the stile as a template, mark the rail with the little 45 degree angle cut needed to mate with the stile.
You can see that I used the offcut from the cheek of the tenon (sticking out at the right) to shim the stile up to the level of the rail. Mark, cut, chisel to the line. Ther's no way around it now, it is time for another test fit.
Now that it is this far along, you can pull the joint apart just a bit to make any necessary adjustments. As you can see, this addition to the M&T narrows the screen by 1/2" and places the through tenon out 1/2" (as seen at the top of the photo.) This will have two wedges driven in and trimmed. But that's for another day as I'm losing the light. The finished joint takes shape.
Next up, the lattice and wedges.


This is a prety sweet looking joint you made there! great to follow this blog, an other great post, keep them comming!
ReplyDeleteCheers
David
Chris,
ReplyDeletegreat post- you're making a habit of this !
A fellow reader sent me a link yesterday to a shoji distributer so I thought you may like to have a look-
good timing on his part.
http://www.konashojidesign.com/paper.htm
looking forward to the next post already!
cheers~
Thanks guys -- and thanks for the link, Tom.
ReplyDeleteBy the way, I'm thinking about springing for a handsaw mitre box. I read that you have one. Do you use it often, has it been worthwhile?
Chris
That's nice work. Never thought a M & T joint could look so beautiful.
ReplyDeleteVery nice work Chris,don't sell yourself short when it comes to procedure though,very clear & concise...
ReplyDeleteBeautifully crisp joinery,that wee added mitre really lifts what is a somewhat utilitarian joint into something quite elegant.
Looking forward to seeing the finished piece.
Black
very nice your work, thanks for your sharing
ReplyDelete