Happy Holidays!
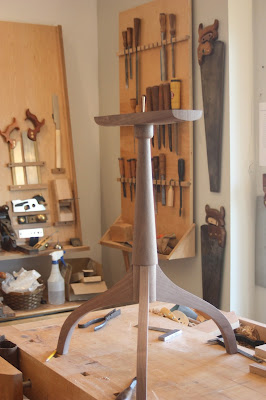
While the second step of the finish on my Hammer-Beam Tables is drying, I'll take the opportunity to post about another recently completed project. This table is a variation on the Shaker Candle Stand idea with a couple of contemporary updates. First, it is made primarily from black walnut -- one of my favorite woods to work with hand tools. Second, the design of the top includes includes a strip of figured maple. I suppose the unifying element is that all the stock comes directly from my scrap pile.
As I've posted about Shaker tables in the past, I'll review the highlights in two posts. And remember, I'm always up for questions or discussion about the techniques.
The base begins with a turned column. I've found that these can be glued up from leftover stock with great success. If I use Titebond II Dark Wood Glue and try to keep the grain running in the same direction on each piece, I've never been able to see any difference between this and solid stock. The design is simple, which just about matches my skills at the lathe. The only hard number that I need to hit is the diameter of the top tenon that will join with the top -- and even this just needs to match a Forstner bit in my collection. The bottom is turned with a slightly narrower diameter, the length of which matches the top of the leg. This creates a base ridge that is the stop for the leg as it sits in its sliding dovetail.
Without removing the column from the lathe, I set up my sliding dovetail jig on the lathe bed. I now mark the stops in the indexing head to allow me to make three cuts, dead center, at 120 degree intervals. The first step is to create a flat spot upon which the leg will rest. Structurally, this doesn't matter, but aesthetically it makes for a better join between leg and column.
Through trial and error, I know that I should first cut a 3/8" groove to a depth of 1/2" in a series of passes in these three places. I follow this with one pass (at a depth of 1/2") with my 5/8" by 14 degree dovetail bit to achieve a perfect sliding dovetail mortise.
When this is complete, remove the column from the lathe and place the dovetail bit in the router table.
I've redesigned, slightly, the shape and size of the cyma-curved leg that is part of the beauty of the Shaker table. The top is larger on this table than on previous iterations, so I've expanded the spread of each leg and reduced a bit of the bulk from my last design. I do this by means of a pair of flexible bending sticks. An initial drawing is made on my plywood template, small blocks are hot glued to the lines at intervals, and then the sticks are clamped to these blocks and manipulated to create fair curves. I trace this and cut the template close to the lines. Finally I hot-glue thin (1/16") strips of hardwood to the template edges -- ensuring a fair, bump-free, routing template. It is important to make this template longer than the actual piece so that you can begin and end your routing without encountering end-grain.
Stock preparation for the legs has a bit of a twist as well. Once the board is planed to the desired thickness, I cut it into leg-sized lengths with a cut that is at a 30 degree angle. This allows me to line the tenon up along this cut line and keep the grain running along the long axis. I trace each leg onto the stock, but I do not cut it to shape yet. This allows me to machine the tenon at the router table with a wide bearing surface.
As usual, you use a piece of spare sock to dial in the thickness and depth of the sliding dovetail tenon. This is a very sensitive part of the build -- one or two mm can be the difference between a good fit and firewood. I like to err on the too-tight side and take a couple of passes with 220 sandpaper to get perfection. I also strike a line with a cutting gauge along this cut. At this angle, and with walnut in particular, you will get tear-out unless you take this precaution.
Only now do I take it first to the band saw, and then back to the router table to bring it to final dimension.
I trim the top and bottom of the tenon and round the top portion to match the round mortise of the column. The actual stop for the mortise is the flat top of the exposed leg above the tenon. These should be trimmed to the same length, and to the thickness of the base ridge to achieve a good fit. Now all that is left to do is put together your first trial fit.
I'll wrap this up with one more post about fashioning the top and applying the finish, as well as a wrap of the Hammer-Beam Tables. Cheers


Beautiful work. Such a classic design, I may have to try this some day.
ReplyDeleteJeff, these tables are a great exercise -- you need to turn, cut sliding dovetails, glue up a top, make templates, rout, surface and finish. Almost a complete woodworking course in one little project. Thanks.
ReplyDeleteLooks good Chris-;)
ReplyDeleteall the best in 2012.
Tom
I discovered your blog by way of Google at the same time as searching for a comparable topic, it seems to be fantastic.Brown TV Bed
ReplyDeleteThis comment has been removed by the author.
ReplyDeletei love your work, you did a great job.furniture company UK
ReplyDeletegreat post, very inspiring, I like your blog
ReplyDeletethanks for your post and for your article very nice.
ReplyDelete